For some people, Lightroom is one of the best things to have been developed for the photographic community; it is a most amazing piece of software that keeps all files organised in one place. For others, it has been a bad experience.
I have heard sad tales from people who downloaded the trial version, installed it, opened it, then disliked it intensely and banned it from their lives. So, what on earth is going on and why should there be all this controversy and division? The answer is very simple, lack of knowledge.
Some say that Adobe should supply a DVD with video tutorials with every purchase; others that there are DVD tutorials available already that can be purchased privately. The problem is that most people do not know where to start; where to find video tutorials and which to buy.
Having used Lightroom for a while, I find it to be a very easy, straight forward marvel of technology. The point is, finding out where and how to start.
In this tutorial, I will showcase how to start and of course how to use Lightroom. My approach will be very simple and easy to understand, not just by those who are computer literate but by those without much computer software knowledge. Advanced users may find my way of explaining Lightroom somewhat simplified, to say the least, but if this is what it takes for people to understand how it works, then so be it. However, I will assume that everyone will be able to download and install the programme.
Part 1
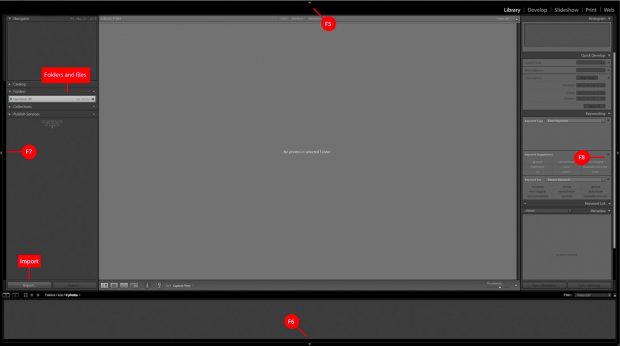
As you can see, I have included some "screen grab" images with the very first screen you see as soon as Lightroom is opened, although I should say, “approximately” the very first screen, depending on your system (PC or Mac). I have added some red buttons on one of them to help you. My advice is to click the four round buttons or try the shortcuts f5, f6, f7, f8, instead. These four panels can be folded away to allow more space, which is most helpful if you are working on a small screen.
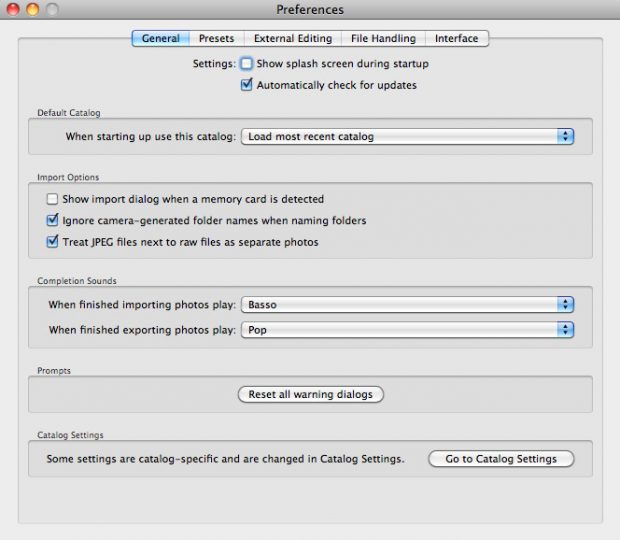
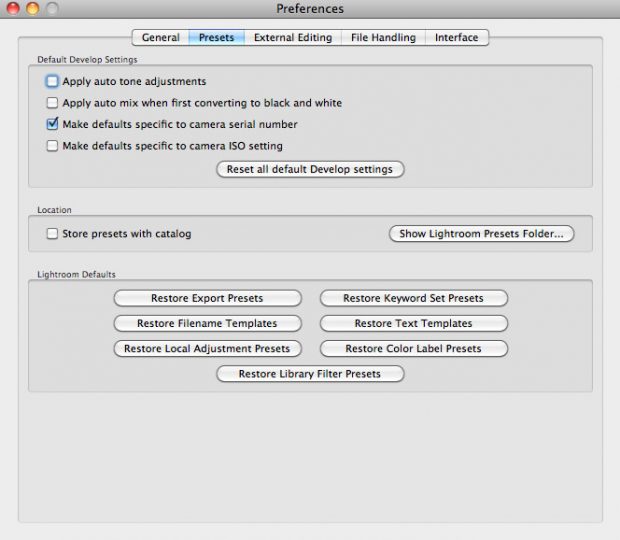
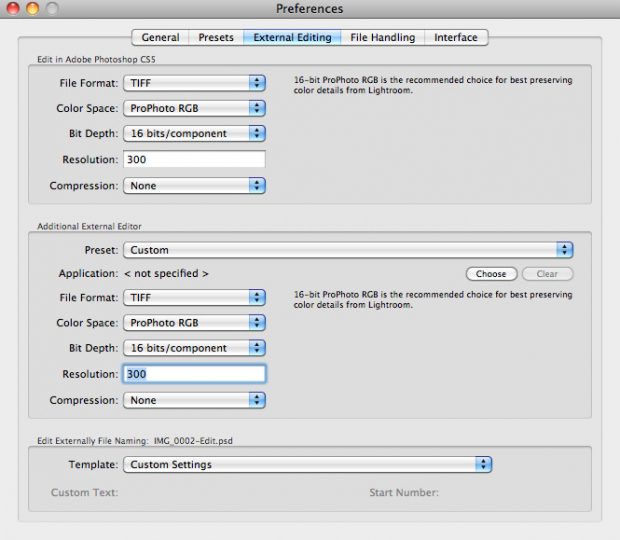
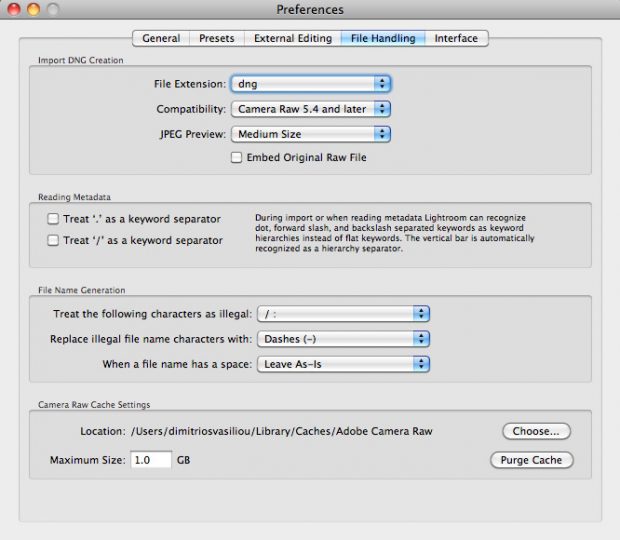
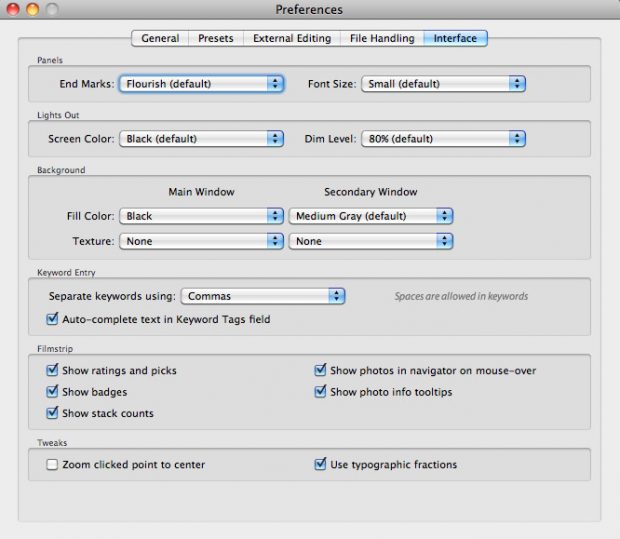
At this point, it is good practice to set up your preferences before you start working on anything else. Here I must state that these are my own personal preferences, which are pretty basic, but they will be fine to get you started; when you become more experienced you can always change them at a later stage. To see the preferences I have set, click on the jpgs, enlarge them, and use them as examples to set the preferences in your Lightroom.
Start by clicking Edit > Preferences (Lightroom > Preferences on a mac).
Part 2
The second part is about importing images into Lightroom. By now you should be familiar with the layout of the main Lightroom panel. On the bottom left of the screen, there is an “Import” button, but before we start importing images, I recommend the creation of a master folder or, as I call it “the family tree” folder.
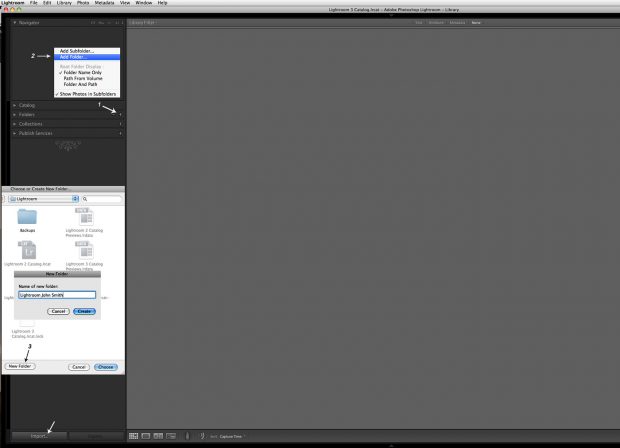
First of all, click on the picture below to enlarge it. Then, right click and "save as" on your desktop. It will help to have the picture next to the browser window.
Now, click on the little cross on the right side of the word Folders (1). This will open a small window; in there select “Add folder” (2). Now a larger window opens where you can select a folder. I recommend you search for the folder called “Pictures” (in the drop down menu), which can be found inside the folder of your own name (i.e. John’s PC). In there you will see a folder created automatically when Lightroom was installed, called “Lightroom”. If you open this, you will find that this is the folder where Lightroom has stored some strange files and a folder named “Backups”. You are in the right place.
Now click on the “new folder”, button (3). A small window will open in which you can give your “family tree” a name. Call it “Lightroom John Smith”, for example (obviously, use your own name); click the “Create” button and then click “Choose”. Nothing appears to have happened and you are faced with a blank window again. Now go to the left of the page and click on the word “Folders”. A drop down menu will be revealed and the folder “Lightroom John Smith” will be included but greyed out, because at this point it is empty. Having reached this far, you have made a good start and your Lightroom future is secured.
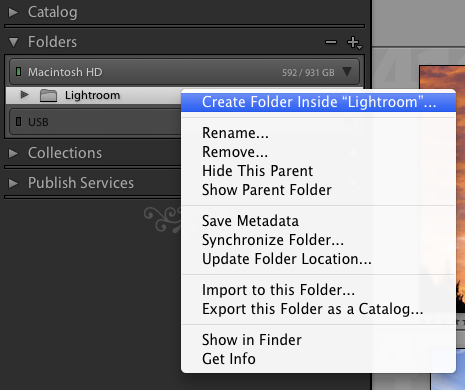 Click on “Lightroom John Smith” (or whatever name you have given your parent folder) and make sure it is highlighted; then, right click to create as many folders and sub-folders as you like (see example picture below). I recommend that first you plan on paper a family tree of your photographic needs, which will guide you in creating a folder system that suits you.
![]() PLEASE NOTE: You can create as many folders as you need and even have multiple folders within other folders. However, and this is highly important: all folders HAVE to be added from within Lightroom otherwise Lightroom will not be able to see them. You can also move (drag and drop) folders if you make a mistake or change your mind, but again ONLY from within Lightroom. You must not create a folder within windows explorer and then expect Lightroom to find it. Here is a sample of my own family tree that suits my needs.
PLEASE NOTE: You can create as many folders as you need and even have multiple folders within other folders. However, and this is highly important: all folders HAVE to be added from within Lightroom otherwise Lightroom will not be able to see them. You can also move (drag and drop) folders if you make a mistake or change your mind, but again ONLY from within Lightroom. You must not create a folder within windows explorer and then expect Lightroom to find it. Here is a sample of my own family tree that suits my needs.
Part 3
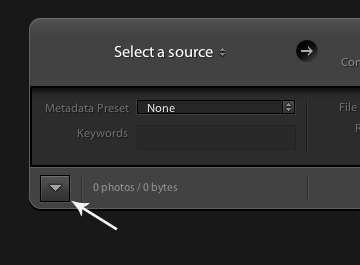 Now it is time to start importing photographs from various sources: e.g. memory cards; hard drive; external hard drives; USB memory sticks. Click the “Import” button, bottom left of the screen, and the import window will now appear on top of your Lightroom screen. This is supposed to be the size of your full screen. If, instead, you get something that looks like a letterbox, click on the arrow button of that letterbox (bottom left, see picture in this paragraph) and you can see the full screen with a lot of new windows, buttons and text. I'll take you through this now.
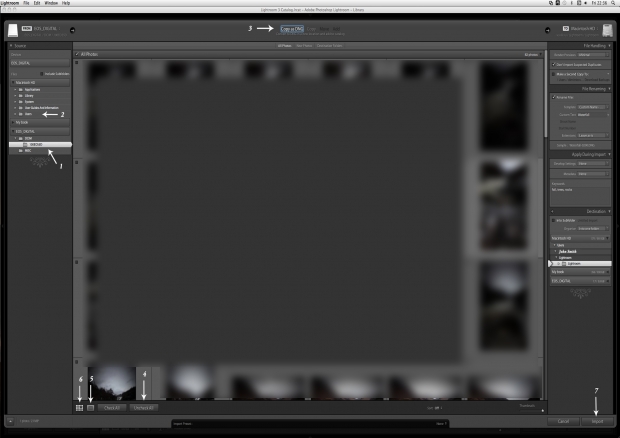
Again, click on the picture below to enlarge it. Then, right click and "save as" on your desktop. It will help to have the picture next to the browser window. This picture is very large, scroll around it for easy reading of text.
Starting from the left side of the panel, find the “source”.
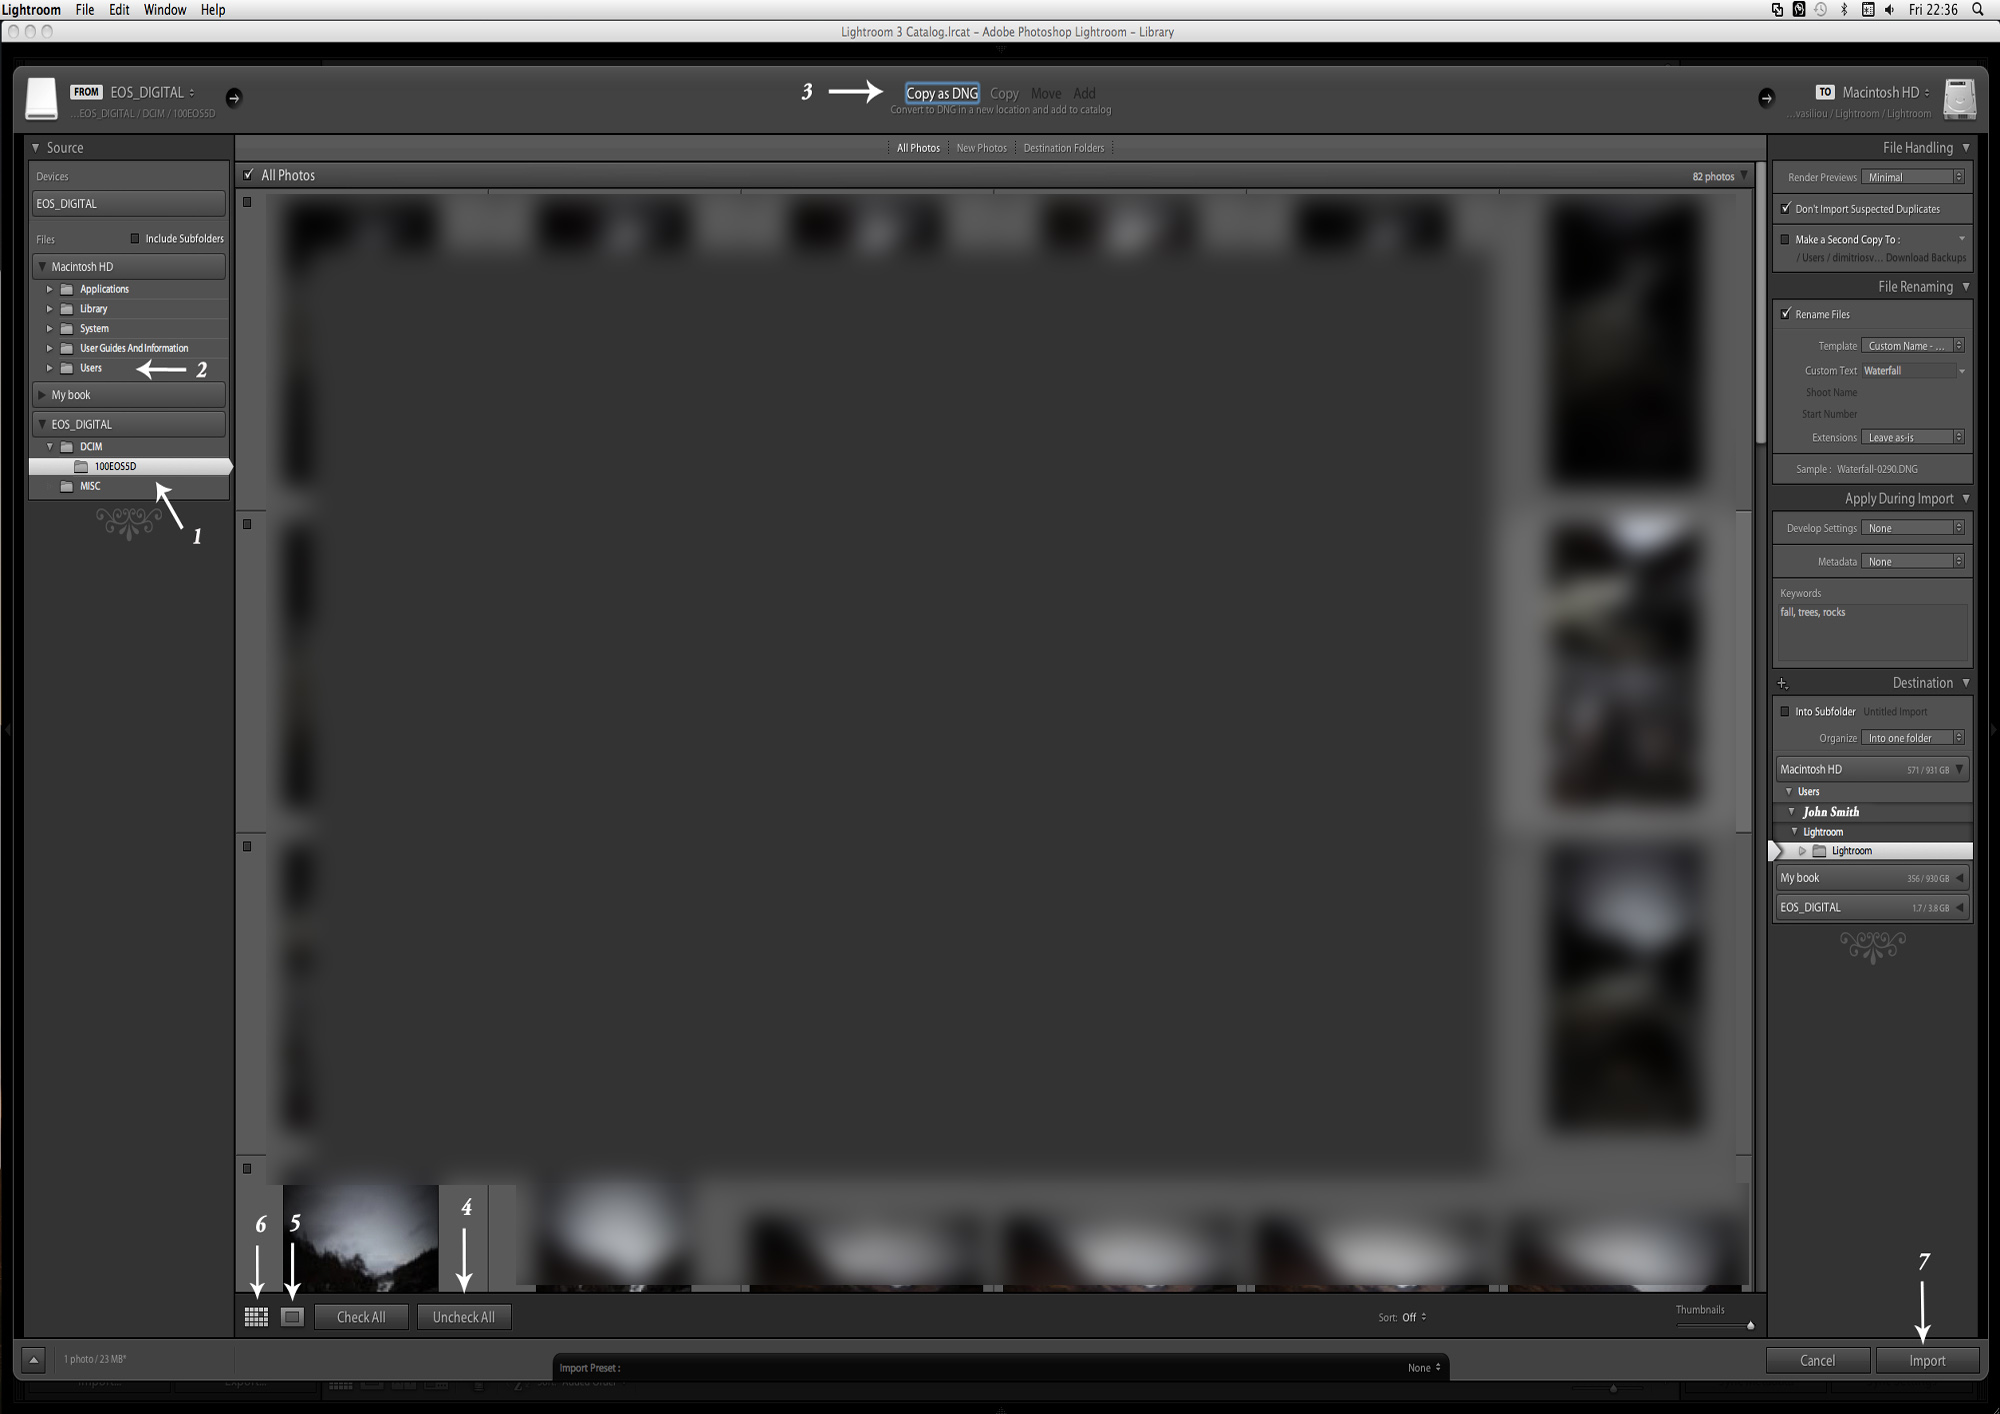
EOS_DIGITAL (my compact flash card) is obvious as I have my card inserted into the card reader and all the images in that CF card are displayed. You can import directly from the card (1) or from a folder in your PC/Mac (2), just find that folder. You can tick “Include Sub-folders” if you wish.
I always Import raw files into Lightroom and use “Copy as DNG” (3). I prefer keeping Adobe’s DNG raw format instead of Canon’s CR2 or Nikon’s NEFF. You can read the pros and cons on this subject by searching the internet. By default, all raw files are selected; click ‘Uncheck All’ (4) and only tick the ones you want to import (unless you wish to import them all). You can select just one file and click the full view (5) for better valuation of the file’s quality before importing. Click Thumbnail screen (6) to go back to multi view.
Now look at the panel on the right side, “File Handling”.
Just follow the screen settings on my picture. You can also put a second copy into a separate folder of your choice if you wish to keep a second folder (on an external back up hard drive for instance).
File Renaming: Tick “rename files” and choose “Custom name-Original file number”. This will allow you to add a custom name (Custom text) and keep the original file number. Set Extensions "Leave as-is".
Apply During Import: You can apply your own settings into a file but it is better to leave this until later. Below that you can add keywords, if you wish, to each file, separated by a coma.
Destination: Listed here will be the “Family tree folders” you created in part 2. Right click on it to create as many sub folders as you wish, or use the ones you have created already as the destination folder for the photographs you are importing.
It is important to avoid ticking “Into Sub-folder” as this will create a new folder every time you import a file. Also, choose “Into one folder” from the “Organise” drop down menu, which allows you to keep the raw files in the folder you have chosen.
Finally, click the Import button (7) and wait until the file is imported into Library. A white line runs from left to right (top left on your Lightroom screen) until the job has been completed. Once imported, click on a picture to highlight it and hit the letter D, this will import the file into the Develop panel, where you can start processing it.
I hope this three-part quick introduction to Lightroom has been useful and an encouragement to start using it. Please use the comments box below to tell us what you thought of this article or even to submit any questions.



3 Comments
Hi Paul
I have nothing against Scotland either, apart from weather and midges as you said.
However, there is a big difference between spending a week sailing in Greece and spending 6 months per year, working under a hot sun.
Greece is superb for holidays but, would it be superb living and working there?
Dimitri
Having just come back from sailing in the Greek islands south of Athens I cannot understand why anyone would want swap Greece for Scotland
PS I have nothing against Scotland apart from the weather and midges
Perhaps Dimitri prefers unpredictable weather to warm sunshine and ever ending blue sky's.
Hi Dimitri
I lived in Athens for 6 months teaching water skiing, made friends for life. I have worked in Scotland on the Ski Slopes teaching mountain safety and First Aid with BASP. Fondest memories Greece.
PS Spent 15 years in the French Alps working as a Instructor, sky patroller and ski Guide, using video cameras to let clients see how they skied But always kept a stills camera with me and still do